A few years ago, I took apart the dashboard in my 1974 3.0CS to replace the wood trim and took some photos and notes during the process. A few folks found my writeup useful but the page I originally had it on is long gone. The whole thing is still in my
picasa album, so I wanted to point that out in case the information is useful to others working on their car.
The whole process is actually straight forward and not particularly difficult, but it might take you most of a day to complete. You will remove the windshield, which means you'll probably replace the windshield gasket. My suggested approach is like this:
- Take out the windshield. I suggest hiring a good glass company to do this for you, but it's not hard to do yourself if you are willing to sacrifice the gasket. In that case, just take a knife and destroy the gasket as much as possible, then gently push the glass out and have someone help you remove and carry it.
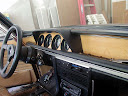
- Take apart the lower dash panels, remove the glove box and the center console. This is shown in my photos, but note that my car doesn't have air conditioning (this makes things much easier!). There are bolts installed vertically through the dash "tray" and these can only be reached by removing all of the lower dash stuff. This also enables you to access the bolts that hold the instrument "hood" to the dash pad. The heater and vent controls can just hang off to the side, there's no need to take them apart.
- Take out the instrument cluster after gently lifting the "hood" a little bit. There are threaded studs that run from the cluster to metal brackets in the dash. Unscrew the plastic nut that holds them on (the right side can be done through the speaker hole) and then pull the cluster out. Replace any burnt-out bulbs at this time.
- You now need to remove the window defroster vents. These are extremely fragile (the top "lip" part, especially) and it's hard to find replacements. Take your time and be very careful with them.
- With the glass out of the way, find and remove all of the screws holding the dash trim to the car.
- You can now take out the rest of the pieces, as shown in my photos.
- The reassembly is, as is usually the case, reverse of disassembly. The glass guys recommend removing the metal bracket things that are attached to the A-pillars (and possibly elsewhere). They make reinstalling the glass really difficult and are not really needed.
I hope you find this information (and the photos) helpful!
2 comments:
Andrey,
Are you the guy that hosted the neue klasse forum? I am looking to contact Jeff in Portland. I need some parts for my vintage racing TiSA.
Any help appreciated.
Steve
lafngrvy@gmail.com
Hi Steve, yes I am. The forum is still available at http://nkbmw.com/board/ -- go ahead and make a post if you haven't yet, I'm pretty sure Jeff participates on it (and if not, Bob "TILUX" Kauffman should be able to get a hold of him). Oh, and post some photos of your TI/SA!
Post a Comment